
- 1. Workflow map
- 2. Terms in this lesson
- 3. Path A - Drag standard blocks
- 4. Path B - Insert from Template library
- 5. Path C - Have AI generate a new block
- 5b. Make Component - global sync
- 6. Comparison with popular tools
- 7. Technical limits
- 8. Common issues
- 9. Smart usage tips
- 10. Self-check checklist
Appifio Creator · Lesson C05 · Intermediate
in Inspector
Beyond editing what’s already on the page, Inspector lets you drag standard blocks (buttons, tables, columns…), insert whole sections from the Template library, or have AI generate a new block from a description - without chatting to the main AI Agent.
Learning goals: Drag standard blocks / insert Template library / AI Generator; and master Make Component - custom components that sync across instances.
Reading time: about 16-20 minutes
Prerequisites: Completed C03-C04 - Element Info + Detailed settings.
Previous / next: ← C04 · → D01 (Files tab)
Main UI labels: Add element · Standard elements · Custom components · Library · AI Generator · Make Component · Component ID · Detach · Component Manager
1. Workflow map
2. Terms in this lesson
| Term | Meaning | Where you see it |
|---|---|---|
| Add element | Sidebar of standard blocks you drag onto the page | "Add" button when Inspector is on |
| Standard elements / Custom components | Two sidebar groups: built-in system blocks, and components you saved with Make Component | Two tabs in the Add element sidebar |
| Template library | Modal for choosing a ready-made section template to insert | "Library" button in the element panel |
| AI Generator | Tab inside Template library that creates a new block from a natural-language description | Tab in the Template library modal |
| AI Library | List of templates AI generated earlier, available for reuse | Inside the AI Generator tab |
3. Path A - Drag standard blocks
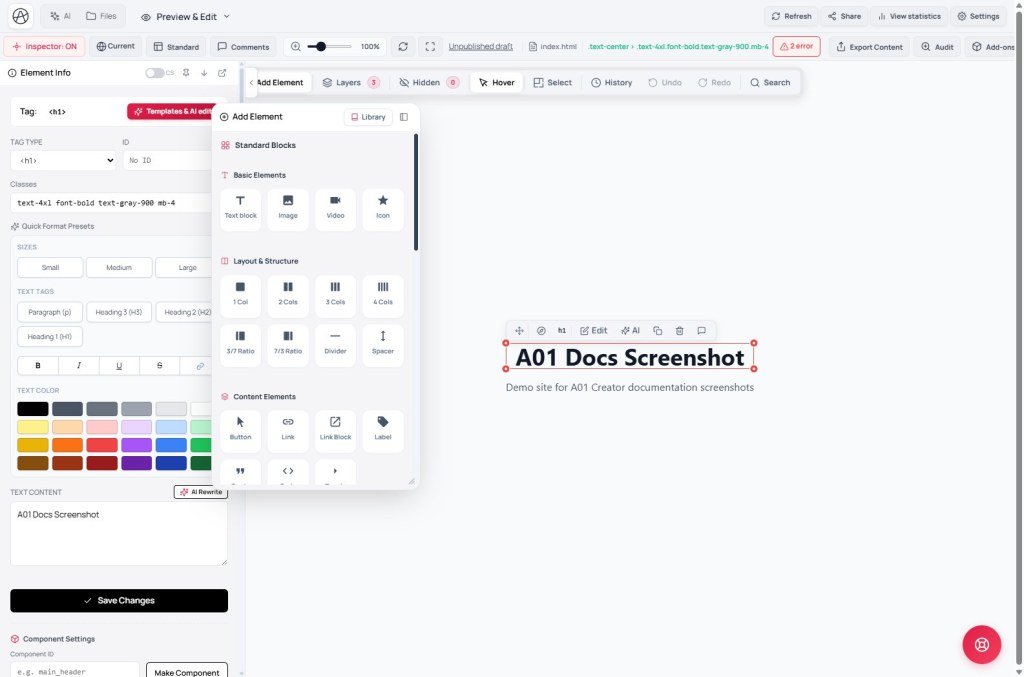
Turn on Inspector and open the Add element sidebar (subtitle: "Drag and drop onto the page"). Blocks are grouped as: Basic elements, Layout & Structure, Content components, Data & Tables, Forms & Input, Callouts.
| Group | Blocks included |
|---|---|
| Basic | Text · Image · Video · Link · Button · Divider · Spacer |
| Layout & Structure | 1/2/3/4 Columns · 3/7 ratio · 7/3 ratio |
| Content components | Map · Link block · Tag/Label · Quote · Icon · Math |
| Data & Tables | 2×2 / 3×3 / 4×4 tables · List (Bullets / Numbers) · Code block |
| Forms & Input | Input field · Text area · Toggle (collapse) |
| Callouts | FAQ · Success · Info · Warning · Note · Tip |
Drag the block to a spot where the drop indicator appears on the preview, then release to insert. If you have no custom components yet, that tab shows: "No components yet. Use Element Info to 'Make Component'."
4. Path B - Insert from Template library
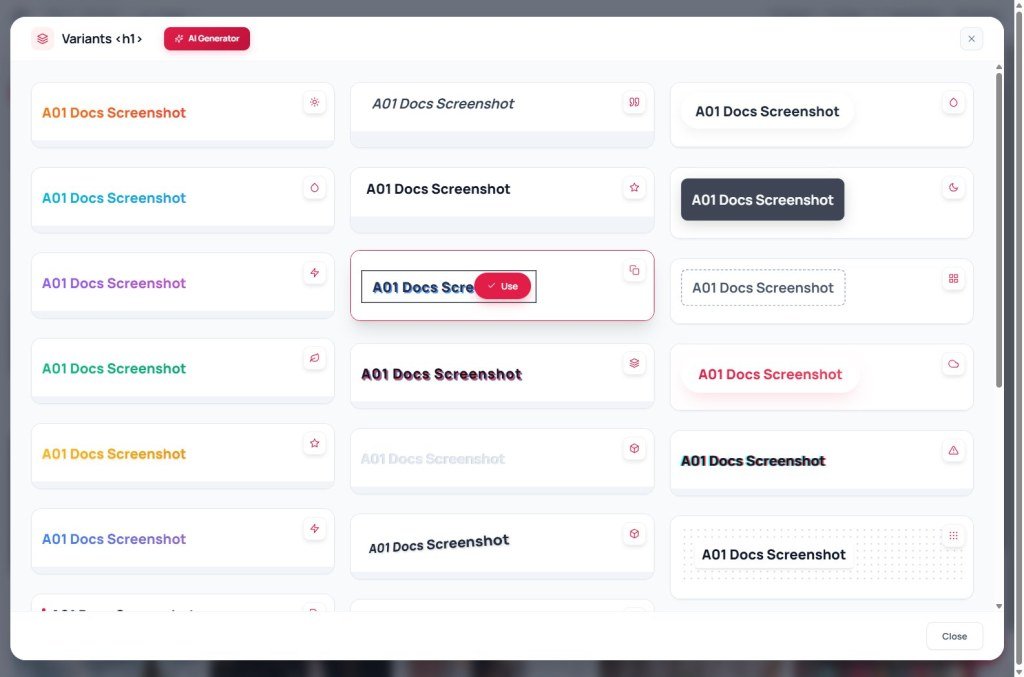
- Select the element that will be the insertion point (the template is added next to or inside it). If nothing is selected, the system prompts: "Please select an element on the page before adding a template."
- Click "Library" to open the Template library modal - subtitle: "Choose a ready-made template to add to your page".
- Use the "Search templates..." field or filter by "All" categories. If nothing matches: "No templates found".
- Choose a template and click "Add Template" to insert it. Click "Close" to exit if you change your mind.
5. Path C - Have AI generate a new block
- In the Template library modal, switch to "AI Generator" (you can "Back to library" anytime).
- Type a description in the placeholder "Describe your idea (e.g. Modern Hero Section)...". Dozens of quick suggestions are available (Hero Section, Pricing Table, FAQ Accordion, Product Card, Timeline…) - click one to use it or as inspiration.
- Click "Generate template". If the field is empty: "Please enter your idea description". While waiting: "AI is designing your template..." / "Generating...".
- The new template is tagged "AI Generated" and saved to "AI Library" for reuse on other pages.
If you see "WebSocket connection error" or "Unable to connect", check your network and try again - template generation needs a realtime connection to the AI server.
5b. Make Component - global sync
Idea: Turn an HTML block into a reusable custom component - unlike standard blocks (each drop is independent). Each drop from the custom tab creates an instance sharing one Component ID. Edit one instance → Creator applies the change to every place with that ID.
| Concept | Meaning |
|---|---|
| Definition | Registered template in the project - listed under Custom components |
| Instance | One placement on the page sharing the Component ID; editing any instance syncs all |
| Detach | Unlink one instance - HTML stays on the page, no more sync |
- On Changes, select a block (header, card, CTA…) in Inspector → open Element Info.
- COMPONENT SETTINGS → enter Component ID (starts with a letter; letters/numbers/
_only, e.g.main_header) → Make Component. Creator marks the block and registers it in the project. - Open Add element → Custom components tab → drag into the iframe (drop indicator).
- Empty tab shows: No components yet. Use Element Info to "Make Component".
- Selecting an instance shows the ID (readonly) + hint that changes sync to all other instances - sync runs when you edit content/style via Inspector / Apply changes.
- Detach - unlink one instance from the shared definition (no more sync). When no instances remain, the definition may leave the tab.
- Manage Components - rename ID, see instance count, delete definition (page HTML may remain but stops syncing).
- Publishing still needs Creator Save changes. Tag Type is usually locked once it’s a component.
Do: headers/cards/footers/CTAs that repeat across pages or many places on one page.
Don’t: Make Component an entire page; Tag Type is locked once it’s a component.
6. Comparison with popular tools
| Tool | Similar | Difference |
|---|---|---|
| Webflow | Similar drag-and-drop block sidebar | Webflow has no AI Generator inside the add-element panel |
| v0 / Lovable | Generate UI from natural language | Creator keeps blocks in AI Library for reuse - you don’t regenerate from scratch every time |
| WordPress (Gutenberg) | Similar "block" concept inserted into the page | Creator inserts real HTML directly, not through a separate CMS block system |
7. Technical limits
You can
- Add 30+ standard block types without chatting to AI
- Save your own components for reuse (Make Component)
- Generate new blocks from a description and store them in AI Library for later
You cannot
- Insert a template without selecting a target element first
- Use AI Generator when the realtime (WebSocket) connection is down
- There’s no hard cap on block count, but many complex blocks can slow the preview
8. Common issues
| Issue | What to try |
|---|---|
| Clicking "Library" does nothing | Select a specific element on the preview first - the system needs a clear insertion point |
| Dropped a block in the wrong place; layout is off | Undo immediately; then use the Layers panel (C04) to drag it to the right spot in the tree |
| AI Generator keeps reporting connection errors | Reload Creator; if it persists, use static Template library templates or chat with the main AI Agent instead |
| Edited one component card but others didn’t change | Check Detach; confirm same Component ID; work on Changes |
| Custom components tab empty | No Make Component yet - Element Info → Make Component first |
9. Smart usage tips
- Use standard blocks for small edits (one button, one column) - faster than chatting to the AI Agent.
- Use Template library when you need a complete section (Hero, Pricing, FAQ) with polished design already built in.
- Use AI Generator when no template fits - describe style clearly (colors, tone, layout) for better results.
- Save frequently used pieces with Make Component so you don’t drag them from scratch every time.
10. Self-check checklist
- Have you dragged at least one standard block (e.g. a Button) onto the page?
- Have you opened Template library and inserted a template?
- Have you used AI Generator to create a block from your own description?
- Have you Make Component’d something, dropped a second instance, and understood sync / Detach?
- Do you know how to return to the static library from AI Generator?
Next lesson
D01 - Files tab: upload, soft/hard delete, Media Library
You’ll manage the file tree, upload images to the right place, organize the Media Library, and understand the difference between soft delete (recoverable) and permanent delete.
Internal navigation (same language)
Appifio Creator · User guide · C05
