
- 1. Workflow map for this lesson
- 2. Terms in this lesson
- 3. Step-by-step instructions
- Step 1 - Open the Layers panel
- Step 2 - Select elements via the Layers tree
- Step 3 - Adjust Spacing and Position & Layer
- Step 3b - Element Info: Detailed settings (any tag) & Computed
- Step 4 - Quick format presets
- Step 5 - Drag-and-drop, Group & Ungroup
- Step 6 (optional) - Smart Layout for repeating blocks
- 4. Comparison with popular tools
- 5. Technical limits
- 6. Common issues
- 7. Smart usage tips
- 8. Self-check checklist
Appifio Creator · Lesson C04 · Basic → Intermediate
CSS, Layers, drag-and-drop & Smart Layout
After you know how to change text and images with basic Inspector (C03), this lesson helps you control layout in detail: open the Layers tree, adjust Spacing and CSS with presets, drag elements into place, and use Smart Layout to build attractive repeating content grids - without writing CSS by hand.
Learning goals: Confidently open the Layers panel, adjust Spacing/CSS with presets, drag elements into order, and build a repeating content block with Smart Layout - no manual CSS required.
Reading time: about 15-20 minutes
Prerequisites: Completed C03 - you can turn on Inspector, select elements, and edit text/images at a basic level.
Previous / next: ← C03 (Basic Inspector) · → C05 (Add blocks & Template library)
Main UI labels: Inspector · Layers · Position & Layer · Spacing · Size · Background & Border · Typography · Layout · Responsive · Advanced Info · CSS Preview · Computed · Smart Layout · Layout library · Palette
1. Workflow map for this lesson
2. Terms in this lesson
| Term | Meaning | Where you see it |
|---|---|---|
| Layers | The page’s parent/child element tree - like layers in design software | "Layers" button on the View space toolbar |
| Layer list | The panel that opens when Layers is on; includes Refresh and a "Scanning page..." status | Panel beside the preview |
| Position & Layer | Settings for position (relative/absolute/fixed) and z-index of the selected element | CSS panel in Inspector |
| Spacing | Margin (outside) and Padding (inside) - Top/Bottom/Left/Right | "Spacing" accordion in the Div panel |
| Quick format | Style presets: H1-H6 · Badge · Quote · List · Table · Code · Toggle · Bold/Italic/… · quick colors - apply then refine in accordions | Quick Format Presets block in Element Info |
| Lasso Select | Draw a region to select multiple elements at once | Lasso icon on the preview when Inspector is on |
| Group / Ungroup | Combine selected elements into one block for shared styling/moves, or split them apart again | Buttons in the element menu when multiple items are selected |
| Smart Layout | Repeating content blocks (features, steps, quotes…) with a dedicated panel for layout and palette | Panel that opens when you click the border of a Smart Layout Card |
| Palette | Color variables (primary, accent, card background, borders…) applied to the whole Smart Layout block | Tab in the Smart Layout panel |
3. Step-by-step instructions
Step 1 - Open the Layers panel
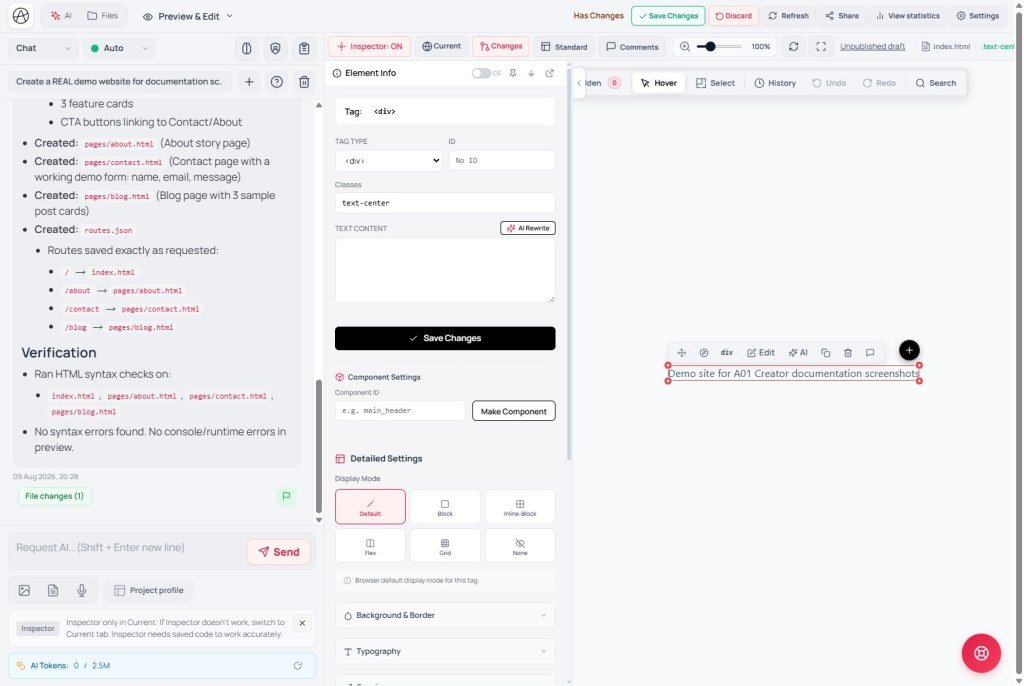
On the View space toolbar, next to the "Inspector" button, you’ll find "Layers" (tooltip: "View layer list (layers)"). Click it to open the Layer list panel.
When it first opens, the system shows "Scanning page...". If the page is empty or has no valid elements, you’ll see "No elements found". Use "Refresh" to rescan after you (or AI) have changed the HTML.
Step 2 - Select elements via the Layers tree
The layer tree shows nested parent/child structure (section → div → h2 → span…). Click a row in the tree to select that exact element in the preview - especially useful when the element is deeply nested and hard to click directly (for example, small text inside many nested divs).
Tip: When you can’t click the target with the mouse: open Layers → find it in the list/tree → click that row → Inspector selects it for you. Alternative: select a nearby element → on the floating toolbar open Navigate → Parent / Child / Prev / Next (C03).
Step 3 - Adjust Spacing and Position & Layer
Select an element → the right panel shows CSS groups as accordions: Size, Position & Layer, Spacing, Background & Border, Layout, and more.
| Group | What you adjust |
|---|---|
| Size | Width/height - use "auto" to follow content |
| Position & Layer | Position (default/Absolute/Fixed) and z-index - "Absolute/Fixed lets you move freely with coordinates" |
| Spacing | Margin (pushes other elements away) and Padding (space between content and the border) - adjust Top/Bottom/Left/Right individually |
A visual diagram in the panel (outer box = margin, inner box = padding) helps you see the difference without memorizing CSS.
If you tweak margin/padding/z-index repeatedly and the layout still looks wrong, select the element and click "Ask AI to edit" (C03) - for example: "Center this block on mobile, keep desktop unchanged". AI already has the selector, so you don’t need to describe where the element is.
Step 3b - Element Info: Detailed settings (any tag) & Computed
In the Element Info panel, Detailed settings is the full style-control block. It applies to any valid HTML tag you select - div, section, p, img, a, button… - not only div.
Controls depend on the tag: each tag only shows matching groups (per-tag mapping - e.g. img / video / iframe get Background & Border, Spacing, Size… but not full Typography like p / h1). Containers (div, section…) usually show all accordions.
| Accordion | Detailed contents |
|---|---|
| Background & Border | Display mode · background color / image / gradient · per-side border · border-radius · multi-layer box-shadow |
| Typography | Font (including enabled project fonts) · size · weight · text color · line-height · letter-spacing · alignment · text-shadow |
| Spacing | Padding / Margin on four sides (+ diagram: Margin = outer box, Padding = inner box) |
| Size & Position | Width / height · position · opacity · flex-item (grow / shrink / basis)… |
| Layout | Flex / Grid - direction, wrap, columns, align… |
| Responsive | Adjust by breakpoint / responsive mode (also see Canvas Mobile/Tablet - C02) |
| Advanced Info | Element meta + CSS Preview (CSS string currently attached - quick view, not a full code editor) |
Apply changes: after editing accordions, click Apply Changes inside Detailed settings to write styles to the draft. To go live: still use the green Creator toolbar Save changes (different from the Element Info Save for Tag/ID/content).
Computed toggle (panel header):
- OFF (default): fields show only user-set values (merged CSS + inline). Unset → empty / auto.
- ON: unset properties fill with browser-computed values (
getComputedStyle), including inheritance. Tooltip: show actual CSS for properties that are not set. - Computed ≠ CSS Preview: Computed fills control fields; Preview is the CSS string in Advanced Info. Computed is for insight - edit then Apply still writes to the draft normally.
Step 4 - Quick format presets
In Element Info, Quick Format Presets apply a ready-made style you can refine further with the Step 3b accordions. Which presets appear depends on the selected element type:
- Headings / text: H1-H6 · Small/Medium/Large sizes
- Badge: Primary · Success · Warning · Danger · Soft…
- Quote: Modern · Classic · Accent
- List · Table · Code · Toggle
- Text shortcuts: Bold / Italic / Underline / Strike / Link
- Quick colors - change sample text/background color in one click
Suggested flow: pick a close preset → open Detailed settings accordions → fine-tune → Apply Changes → check the Changes tab → Creator toolbar Save changes if you need live.
Step 5 - Drag-and-drop, Group & Ungroup
You can drag an element to a new position in three ways: (1) the Move handle on the floating selection toolbar after you select an element (C03 Step 2b); (2) drag in the Layers tree; (3) drag directly on the preview with Inspector on. To select several adjacent elements, use Lasso Select, then:
- Group - combine selected elements into one block (Stash) for shared styling and moves
- Ungroup - split the block back into separate elements
Deleting a whole group asks for confirmation with the exact count ("Delete all N elements in this group?") - read carefully before confirming. There is no separate trash for HTML deleted through Inspector; only Undo can bring it back.
Step 6 (optional) - Smart Layout for repeating blocks
When the selected element is a Smart Layout Card (repeating block: features, steps, stats…), click the element’s border (hint: "Click the element border to open Smart Layout settings") to open the Smart Layout panel. If you picked the wrong element: "Please select a Smart Layout Card element…"
| UI group | What you do |
|---|---|
| Layout library | Pick a preset layout; filter by All / Image / Content box / Bullet / Circle / Number / Steps / Quote |
| Palette | Apply colors to the whole block: Primary, Accent, Muted, Badge, title/description colors, Card/Item/Section backgrounds, icons… · Create palette / Custom palette for your own scheme |
| Layout & Grid | Layout · Width (Full width / Box) · Flow · Grid columns · Rows |
| Smart Items | Item count · Item design / Item style · Icon/Image position (None/Top/Left/Right) · content & text alignment · background color |
| Content mode | For example Expand - controls how the content area grows and shrinks |
| Save / Discard / Close | Commit panel changes or close; deleting a palette confirms with "Delete this palette?" |
The sidebar also offers Smart Layout when adding or editing this kind of block. After changes, use Undo if something drifts; don’t hand-edit each item when the panel can update them all at once.
If the page has no Smart Layout Card yet: ask AI to create a feature/pricing section with Smart Layout, or insert one from the Template library and click the card border again.
4. Comparison with popular tools
| Tool | Similar to Inspector | Difference |
|---|---|---|
| Webflow | Detailed CSS panel, similar Layers tree | Webflow doesn’t offer Smart Layout with AI-generated content and preset palettes like Creator |
| Framer | Visual drag-and-drop, right panel for spacing/position | Framer focuses on components and animation; Creator is tied to AI chat for generating and editing raw HTML |
| Carrd | Same "no code" direction for simple pages | Carrd lacks Inspector’s detailed Layers/CSS; you’re mostly limited to fixed templates |
5. Technical limits
You can
- Select deeply nested elements via the Layers tree
- Adjust margin/padding/position in the UI without typing CSS
- Apply H1-H6, badge, and quote presets in one click
- Change layout and palette for an entire Smart Layout block at once
You cannot
- Multi-layer box shadows - the UI only edits the first layer; edit Code for the rest
- Smart Layout only works on properly structured Smart Layout Cards; ordinary divs don’t get this panel
- Drag-and-drop won’t replace complex responsive logic - still check Canvas Mobile/Tablet views
6. Common issues
| Issue | What to try |
|---|---|
| Layers panel says "No elements found" | Click "Refresh" to rescan; confirm you’re viewing the correct file/route with content |
| Wrong margin/padding breaks the layout | Undo immediately; if you’ve saved many steps, use a Checkpoint (E02) or clone a Version before large experiments (E01) |
| Grouped the wrong elements | Use "Ungroup" right away; always check the preview before acting on a large group |
| Smart Layout panel doesn’t appear when clicking an element | That element isn’t a Smart Layout Card - use the regular CSS panel, or ask AI to rebuild it with Smart Layout |
7. Smart usage tips
- Try Quick format presets before fine-tuning CSS - faster and keeps styles consistent across the page.
- For repeating blocks (features, steps, pricing…), confirm it’s a Smart Layout Card before editing items one by one - the Smart Layout panel updates all cards together and avoids mismatched styles.
- Keep the Layers panel open on pages with deeply nested divs - clicking directly on the preview often selects the wrong parent or child.
- Before a big drag-and-drop reorder, create a Checkpoint (flag on a recent AI message) so you can roll back quickly if the layout breaks.
8. Self-check checklist
- Can you open the "Layers" panel and select a deeply nested element from the tree?
- Can you tell margin from padding using the diagram in the panel?
- Have you applied at least one Quick format preset (H1-H6 or a badge)?
- Have you tried Group and then Ungroup at least once?
- Have you opened the Detailed settings accordions (Background & Border / Typography / Layout…) and tried the Computed toggle?
- If the page has a repeating block, have you opened Smart Layout and tried changing the Palette?
Next lesson
C05 - Add blocks & Template library in Inspector
You’ll use the Add element sidebar to drag standard blocks (columns, buttons, tables, callouts…), open the Template library to insert ready-made sections, and use AI Generator to create new blocks from your description.
Internal navigation (same language)
Appifio Creator · User guide · C04
