
- Full process map
- Glossary
- Steps
- Step 1 - Turn on Inspector
- Step 2 - Hover and click to select
- Step 2b - Toolbar after an element is selected
- Step 3 - Edit text
- Step 4 - Edit links
- Step 5 - Edit images
- Step 5b - Element Info panel: Tag · ID · Classes · by type
- Step 6 - Ask AI to edit the selected element
- Step 7 - AI Rewrite (text in the panel)
- Step 8 - Undo / Redo
- Step 9 - Turn Inspector off and verify
- How Inspector differs from the AI Agent
- Compared with Webflow & WordPress
- Technical limits
- Common issues & fixes
- Tips
- Self-check
Appifio Creator · Lesson C03 · Beginner
select elements, edit text & images
Enable the Inspector button, click elements in the preview, edit text/link/image without chatting to AI, and use Undo/Redo when you mis-edit.
Learning goals: Toggle Inspector at the right time, select the right element, change text/link/image, and use Undo/Redo confidently.
Reading time: about 14 minutes
Prerequisites: Comfortable with View space, Standard/Canvas (C01-C02).
Previous: C02 - Canvas breakpoints & responsive
Next: C04 - Advanced Inspector: CSS, spacing, Layers, drag & drop
Full process map
Glossary
| Term | Meaning | Where on the UI |
|---|---|---|
| Inspector | Mode to select & edit elements directly on the preview | Inspector button |
| Element hover detection | Highlight outline when you hover so you know what will be selected | Automatic while Inspector is on |
| Inspector toolbar | Floating bar on the selected element: Move · Navigate · tag badge · Edit · AI · Duplicate · Delete · Add note | Appears right after you click to select |
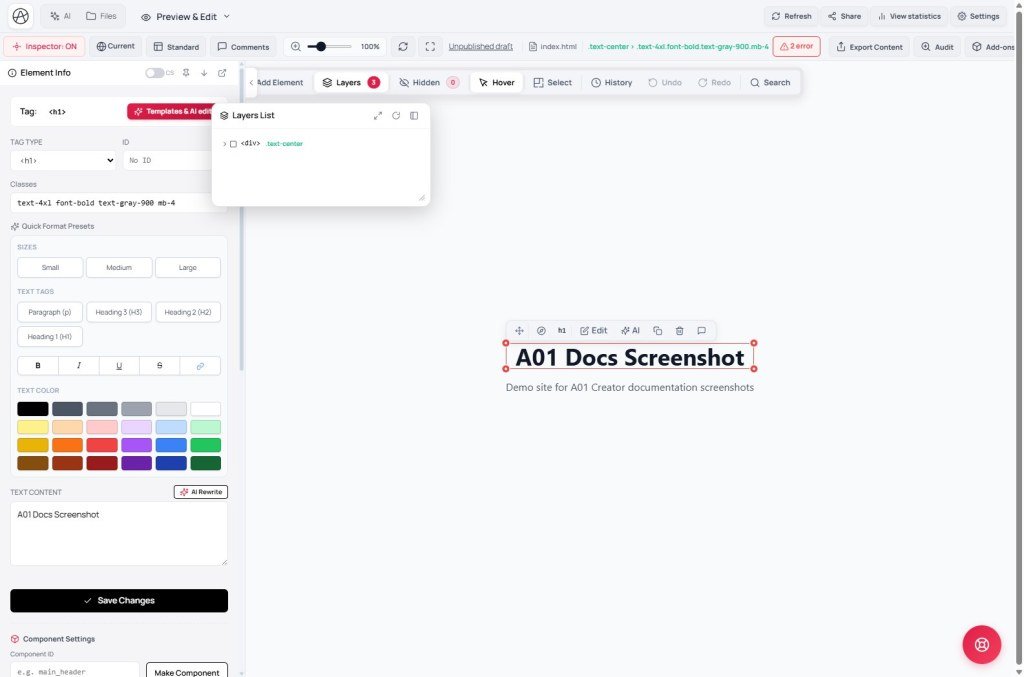
| Layers | Collapsible tree of page elements | Layers button |
| Undo / Redo | Step back / forward one edit | Undo / Redo buttons |
Steps
Step 1 - Turn on Inspector
On the View space toolbar, click Inspector. Tooltip: Toggle element inspector (detect elements on hover). First time, you may see a hint: You can turn on the inspector to edit directly faster - a reminder there’s a quicker path than always chatting with AI.
Step 2 - Hover and click to select
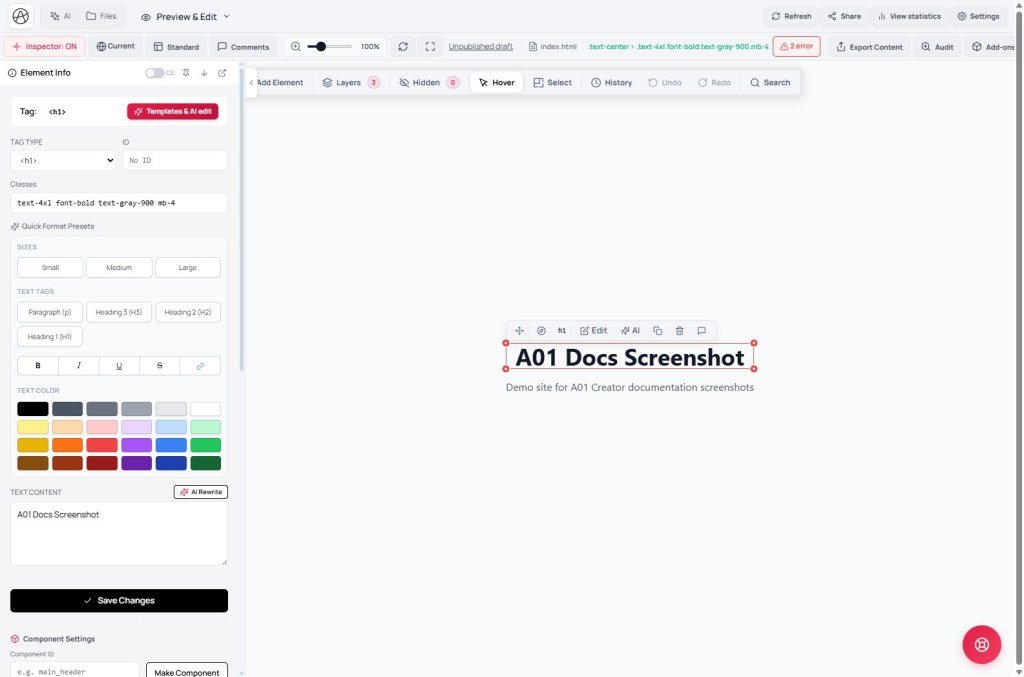
With Inspector on, move over the preview - the element under the pointer highlights so you know the scope (a text line, a button, a whole section…). Click to select: the element highlights and the Inspector toolbar (floating bar by the selection) appears. That bar is the main entry to open Element Info, ask AI, duplicate, delete, add a note, or move to parent/child when a mouse click can’t hit the target.
Step 2b - Toolbar after an element is selected
This bar (system title: Inspector Toolbar) appears after you click to select an element on the preview. Don’t confuse it with the top Creator toolbar (Save changes / Discard).
| Control | What it does |
|---|---|
| Move (drag) | Drag the handle to reposition the element in the structure (drag-and-drop detail → C04) |
| Navigate | Reveals: Prev Sibling · Select Parent · Select Child · Next Sibling - pick parent/child/siblings when you can’t click directly (covered, tiny, deeply nested) |
| Tag badge | Shows the selected tag (e.g. div, p, img) - confirm scope before editing |
| Edit | Opens the Element Info panel - Tag/ID/Classes, content, Detailed settings… This is the toolbar button that opens Element Info |
| AI | Same action as Ask AI to edit (opens chat with element context) - equivalent to the button at the bottom of Element Info |
| Duplicate | Duplicates the selected element on the draft; use Undo if you duplicated by mistake |
| Delete | Removes the element from the draft (no HTML trash - only Undo / Checkpoint / Versions). Same idea as Delete at the bottom of Element Info |
| Add note | Attaches an internal note to the selected element (Pending/Done, Send to AI - see K10). Different from guest review comments |
Tip - element you can’t click with the mouse: (1) Select the nearest clickable element → Navigate → Parent / Child / Prev / Next until you land on the right one. (2) Or open Layers → find the element in the tree/list → click that row → Inspector selects it for you (no need to hit the exact pixel on the preview).
Complete Element Info open flow: turn on Inspector → click to select (toolbar appears) → press Edit → Element Info panel. Then Steps 3-5b to change content/attributes.
Step 3 - Edit text
For text-bearing elements (headings, paragraphs, buttons…), type directly after selecting - like a normal text editor. You don’t need HTML; Inspector writes into the file open on the virtual disk.
Step 4 - Edit links
For links/buttons with an href (menus, CTAs, social icons…), select then update the path in the info panel. If you just created a Route in B04, paste the route path (e.g. /about) instead of a raw file name.
Step 5 - Edit images
Select an image, then replace it from your machine or the Media Library (Files tab / Libraries on the toolbar). For quick crop/annotate before use, see C06 - Photo Editor.
Step 5b - Element Info panel: Tag · ID · Classes · by type
Two different “Save changes” buttons: the button inside Element Info writes the selected element’s attributes/content to the draft. The green Creator toolbar button publishes the whole draft live. Always work on the Changes preview.
Common row: Tag Type (change tags within a compatible group, e.g. p↔span↔h1…; list/table/media usually locked; Components cannot change tag) · ID · Classes.
By type: text + AI Rewrite · URL/target · image + alt · YouTube/Vimeo · Maps · input placeholder · ul/ol list settings. Full style = Detailed settings (Background & Border, Typography, Flex/Grid, Computed…) on any tag → lesson C04. Make Component sync → C05.
Step 6 - Ask AI to edit the selected element
- Click Ask AI to edit → chat opens (if collapsed) with a pre-filled prompt like Edit this element: plus Tag, ID, Classes, Selector, Path, content, size.
- Add your **Request:** line (e.g. “more professional tone, keep brand colors”) and click Send.
- If chat can’t open: Please open the AI Chat tab to use this feature.
- Edits only work on the Changes tab - otherwise you’ll get a switch-tab warning.
Not Audit: this button is part of Inspector, not the Audit modal (E05).
Step 7 - AI Rewrite (text in the panel)
- Make sure the field has text → click AI Rewrite → status like “AI is rewriting…” → result fills the text field.
- Unlike Ask AI to edit: Rewrite focuses on the text in the field; Ask AI to edit opens chat with full element context (tag/selector/path) for broader changes (style, structure…).
- Needs a live connection; offline you’ll see a can’t-reach-AI message.
Step 8 - Undo / Redo
Step 9 - Turn Inspector off and verify
How Inspector differs from the AI Agent
Compared with Webflow & WordPress
Technical limits
Common issues & fixes
Tips
- Only turn Inspector on when you need to edit - leave it off while browsing to avoid accidental clicks.
- Check the tag badge on the toolbar before Edit/AI/Delete - avoid acting on the wrong parent.
- For small repeats (same phone number on many pages), Inspector is faster than describing each page to AI.
- Before a big Inspector experiment, remember you have Undo - don’t hesitate to try within the session.
Self-check
- Can you toggle Inspector on/off?
- After selecting, do you see the floating toolbar and open Element Info with Edit?
- Have you tried Navigate (parent/child) or selecting via Layers when a click is hard?
- Can you select an element and edit text/link/image?
- Do you know Ask AI to edit / the AI button vs AI Rewrite?
- Have you used Undo/Redo after a bad edit?
- Do you know when to use Inspector vs ask AI?
C04 - Advanced Inspector: CSS, spacing, Layers, drag & drop
CSS/presets, spacing, full Layers tree, and drag-and-drop to rearrange layout.
Internal navigation (same language)
Appifio Creator · User guide · C03
