
- End-to-end workflow
- Glossary
- Steps
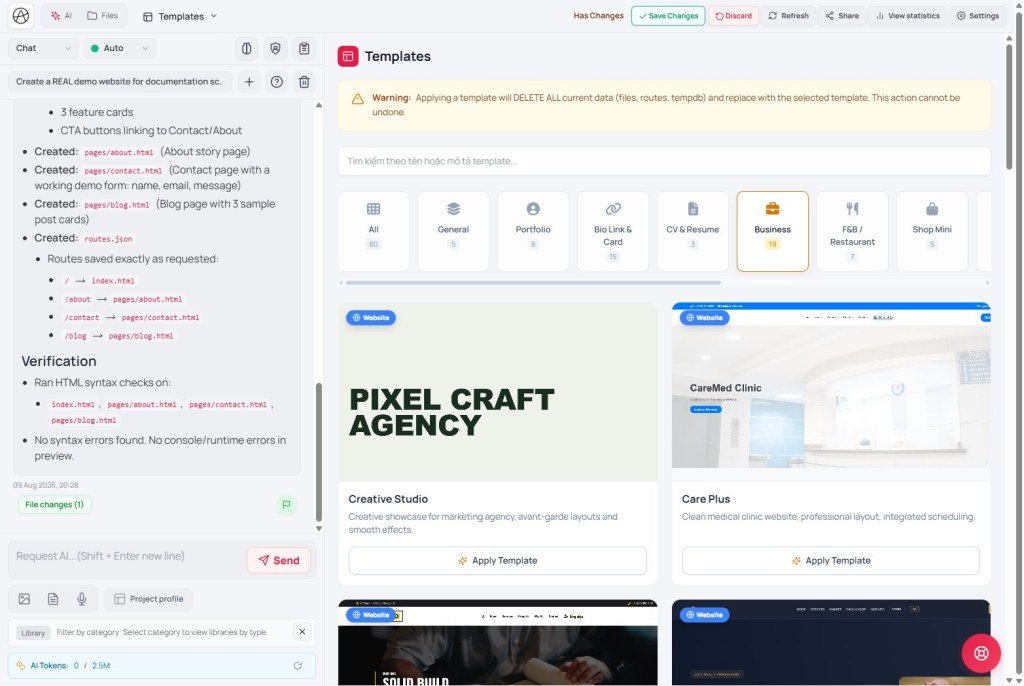
- Step 1 - Open "Templates" and pick a category
- Step 2 - Read the "Warning:" before you apply
- Step 3 - Click "Apply template" or "Apply Advanced edition"
- Step 4 - Review on "Changes"
- Step 5 - Add a Route per page ("Routes" tab)
- Step 6 - Build multi-page navigation
- How the pieces fit together
- Compared with Webflow & WordPress
- Technical limits
- Common issues
- Practical tips
- Self-check
Appifio Creator · Lesson B04 · Beginner
from the "Templates" tab
Use the "Templates" tab to get a multi-page site quickly, understand the wipe warning before you apply, add a Route for each page, and wire a multi-page nav menu - no coding required.
Learning goals: Apply the right multi-page template without unintended data loss, create a Route for every page, and ship a working navigation menu.
Reading time: about 15-20 minutes
Prerequisites: Current/Changes (A03); at least one AI chat (B01).
Previous lesson: B01 - First AI chat
Next lesson: D02 - Routes: map friendly URLs → HTML files
End-to-end workflow
Glossary
| Term | Meaning | Where in the UI |
|---|---|---|
| Template | Ready website shell (multiple HTML files, images, sometimes sample data) | "Templates" tab |
| Temporary project data | Current session data (sample data, config) | Removed when a new template is applied |
| Route | Friendly URL mapped to one HTML file, stored in routes.json | "Routes" tab |
| Advanced edition | Applies the template plus Advanced (sharded) database config - not static files only | "Apply Advanced edition" |
| Multi-page menu | Repeated header/footer nav links pointing at Routes | In HTML; edit via AI/Inspector |
Steps
Step 1 - Open "Templates" and pick a category
In Creator’s tab bar, open "Templates". You see "Template library" with categories such as General, Business, Personal profile, Bio Link & Card, Restaurant, Mini store, Online catalog… For multi-page sites, look for "Website templates" or Business / Online catalog packs - those ship several HTML files (Home, About, Services, Contact…) unlike single-page Bio Link or Landing templates.
Step 2 - Read the "Warning:" before you apply
Warning: Applying a template deletes all current project files, URL routes, and temporary project data and replaces them with the chosen template. This action cannot be undone.
That is the product warning. Everything on the virtual disk, every Route you added, and temporary project data is gone - there is no Undo for this action. If you already did important edits, stop and read Common issues below before continuing.
Step 3 - Click "Apply template" or "Apply Advanced edition"
Two apply buttons differ by data:
| Button | What it applies |
|---|---|
| "Apply template" | Static files only (HTML/CSS/JS/images) - fine for multi-page brochure sites without a dedicated database |
| "Apply Advanced edition" | Static files + Advanced sharded database config - when the template ships sample products/posts that live in Backend |
A confirm dialog appears: "Are you sure you want to apply template '{name}'? This will replace your current design." That second confirm is your last exit. After you accept, you see "Applying template…" then "Template applied successfully!".
Step 4 - Review on "Changes"
Open "View & edit", switch to "Changes", and review the new pages before publishing. In "Files", open each new HTML file to see how many pages the template includes (often home + 2-5 extras).
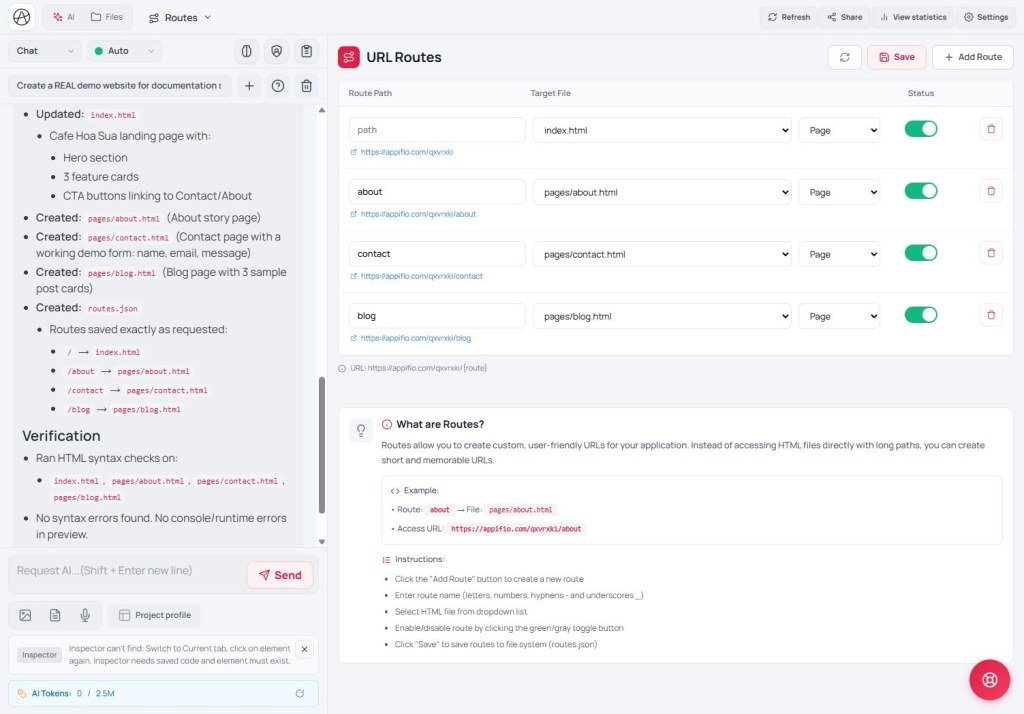
Step 5 - Add a Route per page ("Routes" tab)
Many templates create HTML files (e.g. about.html) without friendly URLs. Open "Routes" ("URL routes" with a "What are Routes?" help block). For each page that needs its own URL:
- Click "Add Route".
- Enter a route name (letters, numbers, hyphens
-and underscores_only) - e.g.about. - Pick the matching HTML file from the Target File dropdown.
- Enable the route with the green toggle (off = listed but inactive).
- Repeat for every page, then click "Save" to write
routes.json.
Result: URLs like /your-link-name/about instead of opening raw filenames (e.g. about.html).
Step 6 - Build multi-page navigation
The header/footer menu does not auto-sync to Routes - ask AI or use Inspector. Fastest: tell the AI "Update the menu: About → /about, Contact → /contact…" matching Step 5. For a few links, use Inspector (C03) and edit each href.
How the pieces fit together
Order matters: Template → Files → Routes → Menu. Templates create files; Routes turn files into friendly URLs; the Menu is how people actually reach those URLs. Skip Routes and pages exist but only via raw file paths (easy 404s with URL rewriting). Skip Menu and you have pretty URLs with no way in from the home page.
Compared with Webflow & WordPress
| Task | Appifio Creator | Webflow | WordPress |
|---|---|---|---|
| Swap template on an existing site | Wipes all files, URL routes, and temporary project data - not undoable | Templates mainly at new-project time; no "overwrite with template" on a live project | Changing Theme does not delete posts/pages - only presentation |
| Pretty URL for a new page | You must "Add Route" per file | Slug created with a new Page | Permalink created with a new Page |
| Multi-page menu | Edit links in HTML (AI or Inspector); no separate drag-and-drop menu builder | Navigator drag pages into menus | Appearance → Menus |
Technical limits
You can
- Get a multi-page site in minutes with one template apply
- Choose any route path, independent of the source filename
- Enable/disable routes individually without deleting them
You cannot
- Merge a new template with old data - all-or-nothing
- Use a drag-and-drop menu builder that auto-syncs to Routes
- Undo a template apply (no Undo for this action)
Common issues
| Issue | Fix |
|---|---|
| Applied a template by mistake; old data gone | Cannot undo in Templates. If you created a Version (Clone) earlier, switch back to that version. |
| New page returns 404 | Missing "Add Route" or the route toggle is off. Fix in "Routes" and "Save". |
| "This route already exists" | Pick another path - each route path must be unique. |
| Menu still points at old links after a template swap | Ask AI to realign menu hrefs to the new routes, or edit in Inspector. |
Practical tips
- Before "Apply template" on a valuable project, always create a Version (Clone) first - your only safety net for a non-undoable action.
- Use short, ASCII, hyphenated route names - easier to remember and less error-prone.
- After all routes exist, ask AI to "verify every menu link matches an enabled route" instead of hunting by hand.
- Prefer a category that matches the product (Business, Mini store…) so the page set is closer to what you need.
Self-check
- Did you read and understand the "Warning:" before applying?
- Does every template page have its own enabled (green) Route?
- Do menus on all pages point at those Routes?
- Did you Save changes and open each link in another browser?
Next lesson
D02 - Routes: map friendly URLs → HTML files
Go deeper on routes.json, slug shape, 404s from missing routes, and how Routes work with Backend/CMS for dynamic detail pages.
Internal navigation (same language)
Appifio Creator · User guide · B04 · Based on Templates and Routes product behavior
