
- 1. End-to-end flow - sending one AI request
- 2. Terms in the AI chat panel
- 3. Step by step - your first chat
- Anatomy of a strong prompt
- 4. When to use which mode
- Three helpers: Auto Reasoner, AI Supervisor, Context summary
- Project profile - brand memory + design tokens
- 5. How this compares to other AI chats
- 6. Technical limits - what you can and cannot do
- 7. Security when chatting with AI
- 8. Common issues
- 9. Practical tips
- 10. Check that you understand B01
Appifio Creator · Lesson B01 · Level: Beginner
write a prompt that produces a full page
This lesson covers picking the right chat mode, writing a structured prompt, and using attachments plus the project profile - so the AI gets closer to what you want on the first send, instead of many fix-up rounds.
Learning goals: Match chat mode to the job, write a structured prompt, and use image/doc/mic attachments plus the project profile so the AI has the right context.
Reading time: about 18 minutes.
Prerequisites: A01-A03 (draft vs live, View & edit).
Previous lesson: A03 - Current and Changes.
Next lesson: B02 - Build a personal / brand biolink.
Key UI labels you will see:
1. End-to-end flow - sending one AI request
2. Terms in the AI chat panel
| Term | Meaning | Where it appears in the UI |
|---|---|---|
| Chat | General Q&A and light edits | AI mode dropdown at the top of chat |
| Coder | Mode focused on writing/editing code to a precise technical brief | AI mode dropdown |
| Debug | Mode for finding and fixing a specific failure | AI mode dropdown |
| UI | Mode focused on UI/UX, color, layout, and motion | AI mode dropdown |
| Architecture | Mode for planning multi-file / multi-page structure before coding | AI mode dropdown |
| Auto Reasoner | Makes the AI “think through” the task before answering/editing | Toggle pill on the chat bar |
| AI Supervisor | Supervises after code runs - checks and may auto-fix issues | Toggle pill on the chat bar |
| Context summary | Stores key decisions so the AI stays on track across many turns | Toggle pill on the chat bar |
| Project profile | Brand pack: name, mission, colors, fonts, logo, docs - keeps style consistent | Button near the chat input |
| Send | Submits the current prompt to the AI | Button at the end of the input |
| New | Starts a new conversation without carrying prior chat history | Button next to the conversation dropdown |
3. Step by step - your first chat
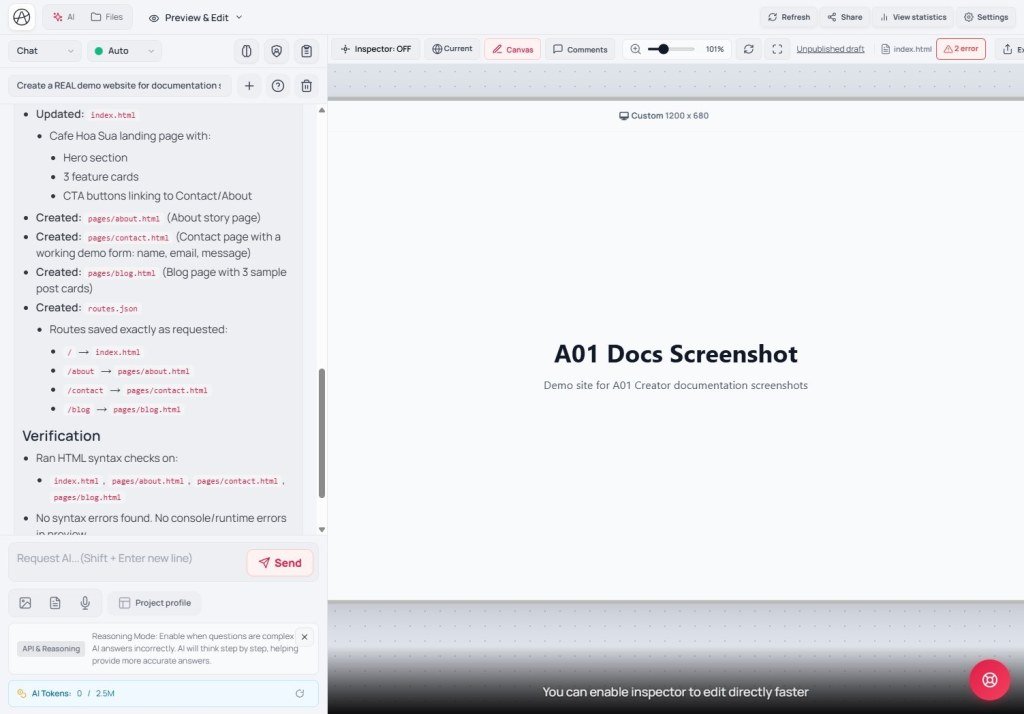
- Step 1 - Pick a mode: open the mode dropdown (default "Chat") and keep "Chat" for a broad first request (build a whole page from scratch).
- Step 2 - Open Project profile if you already have a brand: click "Project profile", fill Project name, Brand name, Mission, Primary goals, and Primary/Secondary/Accent colors if you have them - the AI will reuse this on later prompts.
- Step 3 - Write in the input: click the field with placeholder "Ask AI… (Shift + Enter for a new line)" and use the structure in section 4 below. Shift+Enter adds a line without sending.
- Step 4 - Attach if needed: Upload image for reference (logo, mockup), Upload document for a longer brief, or Mic to speak the request (UI shows "Listening…").
- Step 5 - Send: click "Send". Watch the chat while the AI works; do not close the tab mid-run.
- Step 6 - Read the reply and verify: when the AI finishes, open "View & edit" → "Changes" to see the real result (same idea as A03).
- Step 7 - Refine or restart: send follow-up edits in the same chat so context stays, or click "New" if you want a completely unrelated direction.
Anatomy of a strong prompt
A strong Appifio Creator prompt usually has four parts, written in clear natural English:
- Goal: what you want (page type, purpose).
- Content / layout: sections you need, top to bottom.
- Style: tone, feel (modern / warm / minimal), references if any.
- Constraints: what to avoid (no background photo, no carousel…), device priority (mobile-first).
4. When to use which mode
| Mode | Use when |
|---|---|
| Chat | Broad requests: new page from scratch, Q&A, light copy edits. |
| Coder | Clear technical work: add JS functions, fix calculation logic, wire API/Backend. |
| Debug | You see a concrete bug (button dead, layout broken) and want root cause + fix. |
| UI | Visual polish: layout, color, spacing, motion, beautify one block. |
| Architecture | Large multi-file/page work: restructure menus, add a route system, plan before coding. |
Three helpers: Auto Reasoner, AI Supervisor, Context summary
Auto Reasoner makes the AI reason step by step before acting - useful for complex, multi-constraint jobs; may be a bit slower.
AI Supervisor checks and may fix code after the AI writes it - useful if you do not read code yourself.
Context summary keeps important decisions so later turns stay on track - useful for long projects with many chat turns.
Project profile - brand memory + design tokens
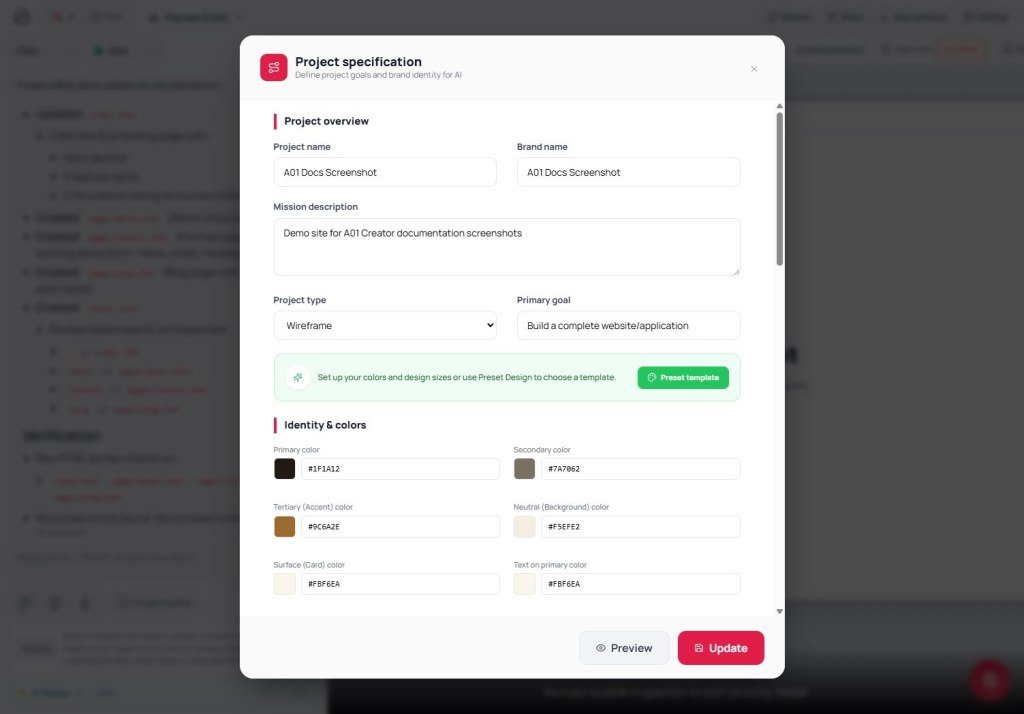
Open Project profile → modal Project profile (Project specification). Fill at least this before heavy chatting:
- Overview: Project name, Brand name, Mission, Primary goals, Wireframe vs High-fidelity.
- Colors (tokens): Primary, Secondary, Tertiary/Accent, Neutral, Surface, text on primary.
- Typography / Rounded / Spacing: fonts, Display/H1/Body/Label, corner radii S/M/L, spacing S/M/L - or pick a Preset template.
- Style: Button / Card / Navbar.
- Assets: Logo URL, Figma, Docs · Open Media Library if you need to upload.
- Click Update; use Preview in the modal to check the design system. Field-by-field detail: lesson B06.
Project profile is not the same as Prompt Studio (tone/skills). Both inject into context → a long profile uses more tokens (T11). Export can pull App name/Logo from here.
Fill once; later prompts already “know” your brand - you do not need to repeat “use blue #123abc” in every message.
5. How this compares to other AI chats
| Tool | How chat/build works | How Appifio Creator differs |
|---|---|---|
| ChatGPT / Claude (generic chat) | Returns text/code you paste into a project yourself | Creator writes real files on the virtual disk and shows them in preview - no manual copy-paste |
| Lovable / v0 | One prompt builds an app; few specialized modes | Creator’s five modes (Chat/Coder/Debug/UI/Architecture) keep the AI focused on the job type |
| Cursor (IDE AI) | Deep coding; you usually need to read code to review | Creator adds AI Supervisor for auto-checks plus visual Inspector so non-coders can still control the result |
6. Technical limits - what you can and cannot do
You can
- Build a full page from one detailed Chat-mode prompt.
- Attach images so the AI can match a visual reference, or long requirement docs.
- Keep brand consistency across pages via Project profile without repeating descriptions.
You cannot / still limited
- Prompts over the character limit are blocked (a {current}/{max} counter appears near the limit).
- Mic depends on browser microphone permission - blocked or unsupported browsers will not work.
- AI Supervisor / Auto Reasoner slow responses - avoid both for trivial one-line asks.
7. Security when chatting with AI
- Do not paste real API keys, secrets, or passwords into chat - use Backend → Secrets manager instead of typing them for the AI.
- Attached docs/images are read to generate content - avoid sending unnecessary sensitive customer data.
- AI Tokens are metered monthly (separate "AI Tokens" area) - watch usage so you do not hit the cap mid-critical work.
8. Common issues
| Situation | What to do |
|---|---|
| Result misses the mark even though you described it | Check that the prompt has all four parts (goal/content/style/constraints); send a concrete follow-up in the same chat instead of rewriting from scratch. |
| AI edited unrelated areas | Open "File changes" to see the real scope (A03); reject unwanted hunks in Diff, or Discard and rewrite a narrower prompt. |
| Mic does not capture speech | Confirm microphone permission; try current Chrome/Edge if an older browser lacks support. |
| Long chat; AI “forgets” the first requirements | Turn on "Context summary", or click "New" and restate Project profile / core requirements. |
9. Practical tips
- Fill Project profile before the first prompt - it saves many later color/font fix rounds.
- Split big jobs: use Architecture to plan structure, then Coder/UI to implement pieces.
- For a concrete bug (dead button, mobile layout break), switch to Debug and describe the symptom - do not guess the root cause in the prompt.
- Always check the "Changes" tab after each Send before the next prompt - avoid stacking edits on a broken base.
10. Check that you understand B01
- Which mode for: a new page? a concrete bug? color/layout polish?
- What are the four parts of a strong prompt?
- How do Auto Reasoner, AI Supervisor, and Context summary differ?
- How does Project profile help later prompts?
- After "Send" and the AI replies, what should you do next?
Next lesson
B02 - Build a personal / brand biolink in one sitting
You will apply B01 in a real end-to-end flow: prompt or template → Canvas Mobile check → Inspector polish → Save changes.
Internal navigation (same language)
Appifio Creator · User guide · B01 · Based on Creator chat and project profile product behavior
