
Appifio Creator · Lesson D02 · Intermediate
map friendly URLs to HTML files
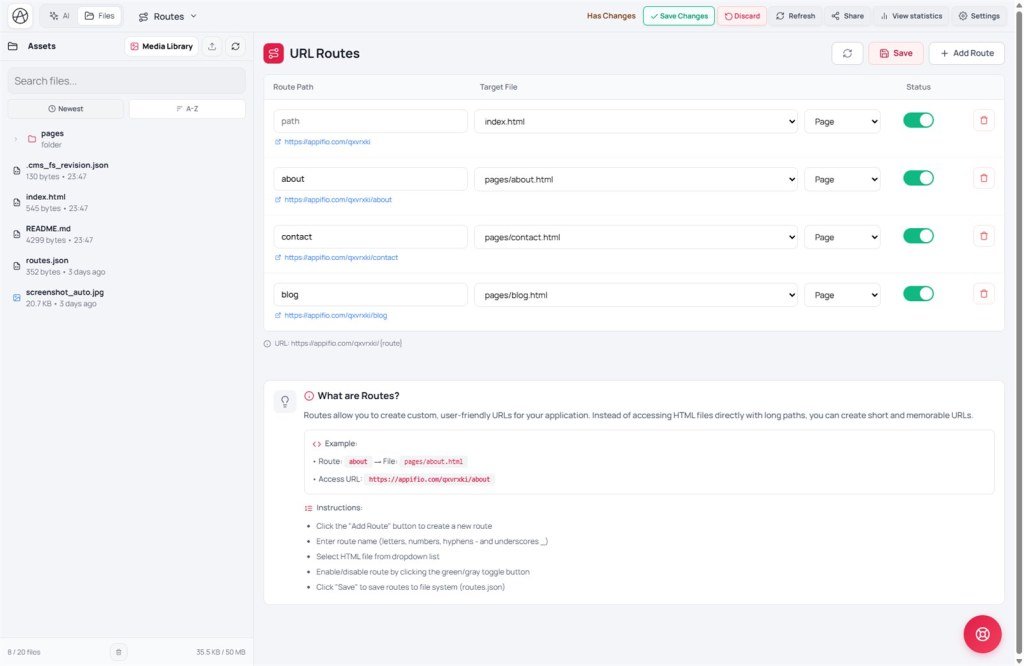
Instead of long raw HTML paths, give visitors short URLs like /contact that point to the right page. This lesson follows the same 5 system steps - do them in order and you won’t go wrong.
Learning goals: Create a new route in 5 steps, understand why a missing route breaks access, and know how to check/fix a broken route.
Reading time: about 12-15 minutes
Prerequisites: An HTML file in the project (D01) that needs a URL.
Previous / next: ← D01 (Files) · → D03 (Libraries & fonts)
Main UI labels: Routes · URL path · Add Route · Save · Route Path · Target File · Type · Status
1. The standard 5 steps (system guide)
routes.json)Remember: These are the same five guide lines shown in the Routes tab under “How to use:” - open the tab anytime to see them again.
2. Glossary
| Term | Meaning | Where in the UI |
|---|---|---|
| Routes | Tab for custom app URLs | Top tab bar in Creator |
| Route Path | The URL segment you choose (e.g. about, blog/post-slug) | Column in the routes table |
| Target File | The real HTML file the route points to | Dropdown when creating/editing |
| Status | On/off for the route (green toggle = on) | Column in the routes table |
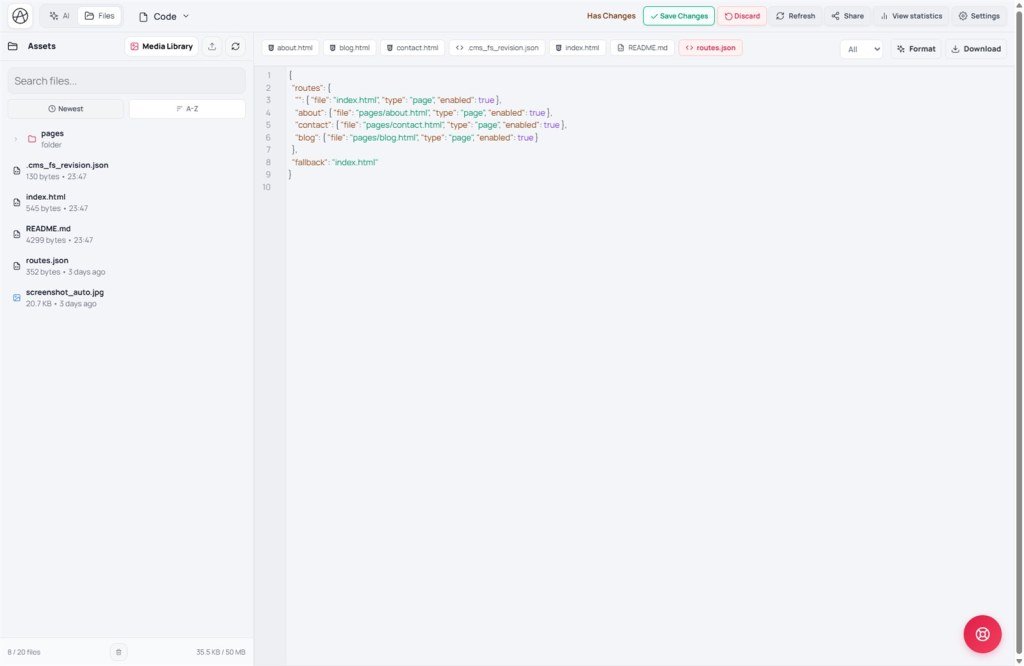
routes.json | File that stores all route config | Written when you click Save |
3. Step details
Example (matches the UI sample)
| Route: | contact |
| File: | contact.html |
| Visit URL: | /your-site-slug/contact |
Steps 1-3: Click Add Route, enter a name (letters/numbers/-/_ only - no accents, no spaces), pick the HTML file in Target File.
Step 4: Flip Status to green to activate now; leave gray if you want to create first and enable later.
Step 5: Click Save - required. Without it the route isn’t written to routes.json and disappears when you leave the tab.
When there are no routes yet
The tab shows: No routes yet. Click “Add Route” to create one. - normal for a new project, not an error.
4. Common issues
| Situation | Cause & fix |
|---|---|
| URL errors / page won’t open | Check the target HTML file exists - “A route needs a matching HTML file; if the file is missing the route fails” |
| Route added but still dead on live | “Check the HTML file exists and the route was saved” - both required: file present AND Save clicked |
| Menu/button links to 404 | No route for that page yet - add one to the right file, then update the menu link |
| Route name has accents or spaces | Only letters, numbers, -, _ - use ASCII (e.g. contact, not accented names like lien-he or spaces) |
| Route exists but Status is gray | Turn Status green, then Save again |
5. Compared with popular tools
| Tool | Similar | Different |
|---|---|---|
| WordPress (Permalinks) | Pretty URLs to content | WordPress auto-builds permalinks per post; Creator maps each route to a static HTML file by hand |
| Webflow | Dedicated pages/URL management | Webflow ties routes to CMS collections; Creator ties routes to specific HTML files |
| Linktree | No route table - single page | Creator supports many routes/pages - better for multi-page sites than a one-page biolink |
6. Technical limits
You can
- Create many routes to different HTML files
- Toggle a route off without deleting it
- Use nested paths like
blog/post-slug
You can’t
- Use accented characters or spaces in route names
- Have a working route without Save - UI-only changes are temporary
- Keep a route working if its HTML target was deleted (soft or permanent) from Files
7. Tips
- Create the HTML file first, then add the route - avoid orphan routes with no file.
- Keep route names short, ASCII, memorable - better for SEO and typing.
- After adding/editing several routes, try each URL on the unpublished draft before Save changes to live.
- For multi-page sites (B04), list the routes you need before you start so you don’t forget a page.
8. Self-check
- Have you created a new route with all 5 steps?
- Have you opened the new URL to verify it works?
- Can you explain why a route fails when the file is missing or Save wasn’t clicked?
- Do you know how to disable a route temporarily without deleting it?
Next lesson
D03 - Libraries & fonts: Bootstrap, icons, charts
Turn on CDN libraries (Bootstrap, Font Awesome, Chart.js) with a few clicks instead of hand-writing script/link tags.
Internal navigation (same language)
Appifio Creator · User guide · D02
