
Appifio Creator · Lesson F01 · Intermediate → Advanced
API key & quota
Opening lesson for the F series: what Aura Backend Storage is, how Easy differs from Advanced in plain language, and how to keep the API key safe before you ask AI to write forms/data.
Learning goals: Open the Backend tab, read the API key/quota correctly, pick Easy or Advanced for your app size, and understand the two Save layers (inside Backend vs Creator toolbar).
Reading time: about 15-18 minutes
Prerequisites: An app/link already open in Creator (A01).
Previous: A01 - Creator overview.
Next: F02 - Contact form saved to Storage.
Main UI labels:
Important - Prompt & Skills
After you choose Easy or Advanced: open Prompt & Skills → Appifio prompt template and turn on exactly one guide that matches Backend.
- Easy →
Appifio Easy Storage - Complete AI Guide - Advanced / Aura →
Appifio Aura Storage (Advanced) - Complete AI Guide - Advanced + CMS → also
Appifio Aura CMS + Storage - Complete AI Guide(AS19) - still do not enable Easy
(Optional) Shared frame: Appifio Storage - Shared Prompt Framework (Easy + Aura) - still enable only one Easy or Aura complete guide.
The AI Agent then has Prompt + skills - you don’t need to paste Storage docs.
Never enable Easy + Aura together - rule conflict. Details: BR02 · CMS: AS19.
1. Map: what’s in the Backend tab
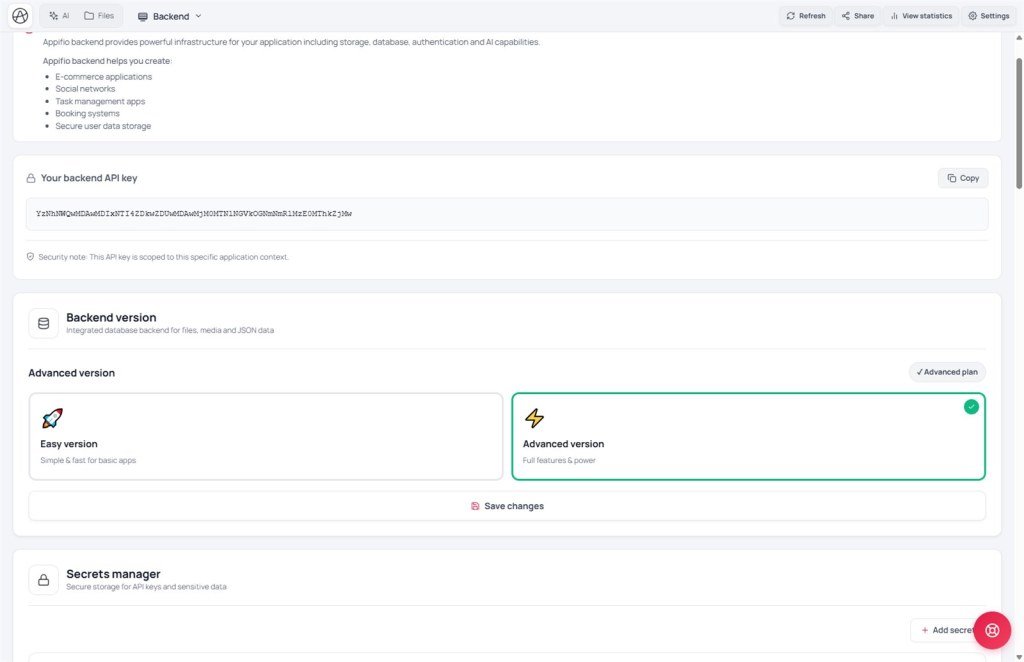
Think of Backend as the app’s “tech room”: keys (API key), data package (Easy/Advanced), and raw stored data - separate from UI design under View & edit.
2. Glossary (3 columns)
| Term | Meaning | Where in the UI |
|---|---|---|
| Backend API key | 32-character hex string unique to this app - the site uses it to call data storage | "Your backend API key" block, Copy |
| Aura Backend Storage | Built-in data + file store for the app - no separate server rental | Backend tab |
| Easy / Advanced | Two backend versions: Easy is simple/fast; Advanced is full (CMS, large lists, MCP…) | Backend version in the Backend tab |
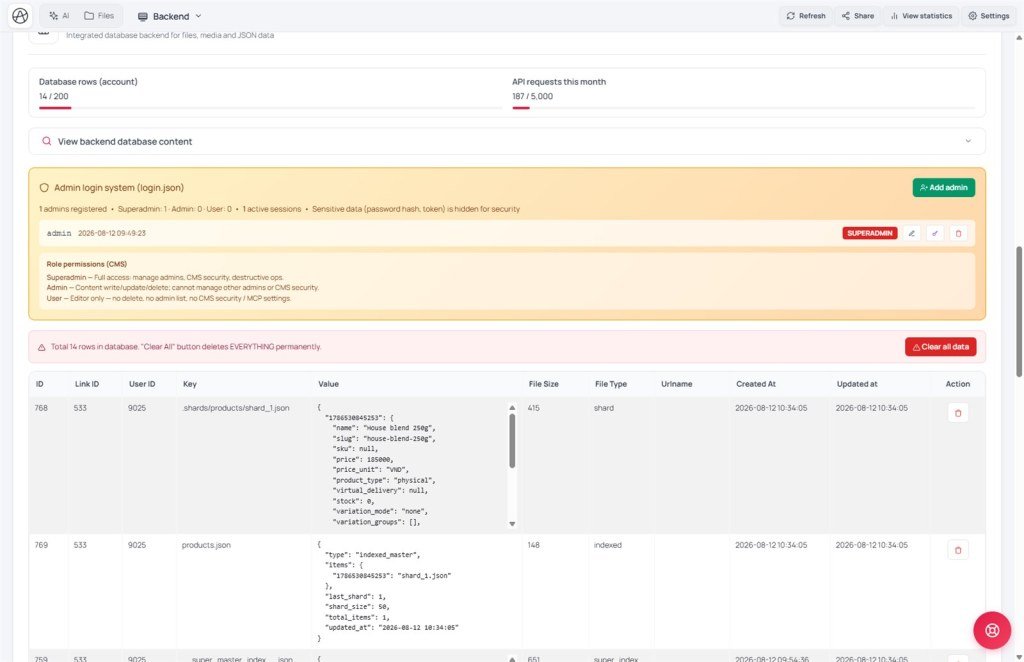
| Database rows | Total indexed data rows on the account (quota) | Backend tab, next to API key |
| API requests this month | Read/write call count this month (quota) | Backend tab, next to API key |
| App storage | Raw Key / Value / Updated at table - check that AI wrote correctly | "View backend database content" |
| Save changes (toolbar) | Push HTML/JS draft to live - visitors start seeing the new version | Creator toolbar |
3. Easy vs Advanced - for non-coders
You don’t need deep tech - just pick the right “power pack” for the app:
| Easy (simple) | Advanced | |
|---|---|---|
| Analogy | A small notebook - enough for a contact form or simple landing | A warehouse with shelves - blog, shop, CMS, many records |
| Best for | Biolink, landing, one contact form | Blog + Aura CMS, shop, multi-user webapp |
| Aura CMS (/your-link-name/cms) | Usually not enough features | Needs Advanced + matching account plan |
| Long lists (contacts, orders…) | Limited - breaks more as the app grows | System auto-splits large lists |
4. Two Save layers - don’t mix them up
This confuses beginners most. There are two different Saves:
| Layer | What you click | Result |
|---|---|---|
| 1 - Save inside Backend | Pick Easy/Advanced → Save in the Backend area (not the top toolbar) | App records the new backend version; the page uses the matching data toolkit |
| 2 - Save changes (toolbar) | Green "Save changes" on the Creator toolbar | Draft HTML/JS goes live - visitors on the real link see the change |
5. Working with the Backend tab
- Open the Backend tab on the Creator tab bar.
- Read "Your backend API key" - click the key to select all, or click Copy.
- If you see "No API key yet" or "Invalid API key" - create/check the key in Appifio account settings (you can’t edit it here).
- Check Backend version: default is often Simple version (Easy). Need CMS/shop/blog → choose Advanced version → Save inside Backend.
- Back to the toolbar → click Save changes so visitors see the new backend version on the live site.
- Watch Database rows and API requests this month - know when you’re near quota.
- Click View backend database content for the raw table - useful after testing a form or asking AI to write data.
6. Compared with other tools
- Firebase / Supabase: also an API key + JS SDK, but you design the schema yourself; Aura Backend lets AI pick file names/types from your request.
- Airtable: similar Key/Value-style viewing, but not wired directly into a live HTML page like Aura Storage.
- Bubble: integrated “database” idea, but not a clear Easy/Advanced split like Appifio.
- WordPress + plugins: extra installs for form/database; Appifio bundles them in Backend.
7. Technical limits
You can
- Store contact forms, blogs, shops without a private server
- View raw data in Backend
- Pick Easy for small apps, Advanced for CMS/MCP
- See row/request quota on one screen
You can’t / limits
- Create/change the API key inside Backend - use Appifio account settings
- Quota is per account, not per app
- Mid-project Easy↔Advanced switches can mismatch what the app expects
- Advanced needs an Advanced plan - UI choice alone isn’t enough
8. API key security
- This key grants admin power for this app - don’t paste it into groups or shared screenshots.
- The key is unique to the current app context - don’t reuse one key across different apps.
- If you suspect a leak, regenerate the API key in Appifio account settings (no “Rotate key” button inside Backend).
- Sensitive secrets (mail API, payments…) go in Secrets manager, not hard-coded in HTML (F04).
9. Common issues
| Situation | Fix |
|---|---|
| “No API key yet” | Create an API key in Appifio account settings, then reload Backend |
| “Invalid API key” | Copy the exact 32-character hex string, no extra spaces |
| Chose Advanced but forms still fail | Confirm Backend Save and toolbar Save changes |
| “No data in app storage” | Normal for a new app - data appears after the first write (appendData/writeFile) |
| Need to wipe test data | Use “Delete all data” - type the confirmation line; cannot undo |
10. Tips
- Before asking AI to “create a form that saves data,” open Backend once to confirm a valid API key and the right Easy/Advanced choice.
- Pick Advanced from day one if you know you’ll build shop/blog/CMS - less data migration later.
- After every backend version change, ask: “Did I Save in Backend and Save changes on the toolbar?”
- Watch quota on high-traffic apps - hitting quota looks like an API error, not a code bug.
11. Self-check
- Can you find the API key and copy it correctly?
- Can you choose Easy or Advanced by expected scale (no coding required)?
- Can you explain the two Save layers (Backend vs toolbar)?
- Do you know why the key must stay private?
Next lesson
F02 - Contact / signup form saved to Storage
Apply Backend knowledge to create a first contact form that writes to Aura Storage with appendData.
Internal navigation (same language)
Appifio Creator · User guide · F01
