
Appifio Creator · Lesson H02 · Advanced
sandbox, token, IDE setup
For anyone who wants a familiar IDE (Cursor, etc.) to edit the app with AI - and must keep the sandbox vs live boundary clear.
Learning goals: Enable MCP in the right order, create a safe token, configure the IDE, and know why IDE edits are not live yet.
Reading time: about 15 minutes
Prerequisites: Backend tab (F01); an MCP-capable IDE (e.g. Cursor) and Node.js 18+ on your machine.
Previous → next: F01 → H02 → H04 (History/DOM search when working in parallel)
1. Required order
mcp-config.json.example → paste path (Method A "/" or Method B "\\\\") into IDE MCP settings2. Glossary (exact UI labels)
| UI label | Meaning | Where |
|---|---|---|
| Enable MCP integration | On/off flag for the MCP gateway | MCP tab or CMS → Settings → MCP |
| Create / resume session | Start or continue sandbox - required before Create token | MCP tab |
| Create token | Issue bridge token - shown in full once; copy immediately | After a sandbox session exists |
| Download Appifio Aura MCP package (.zip) | IDE config + bridge package - expires ~24h | MCP tab |
| Save MCP state | Commit config after enabling gateway + token | Bottom of MCP tab |
| Revoke | Invalidate a leaked or unused token | API Token table |
3. Detailed steps
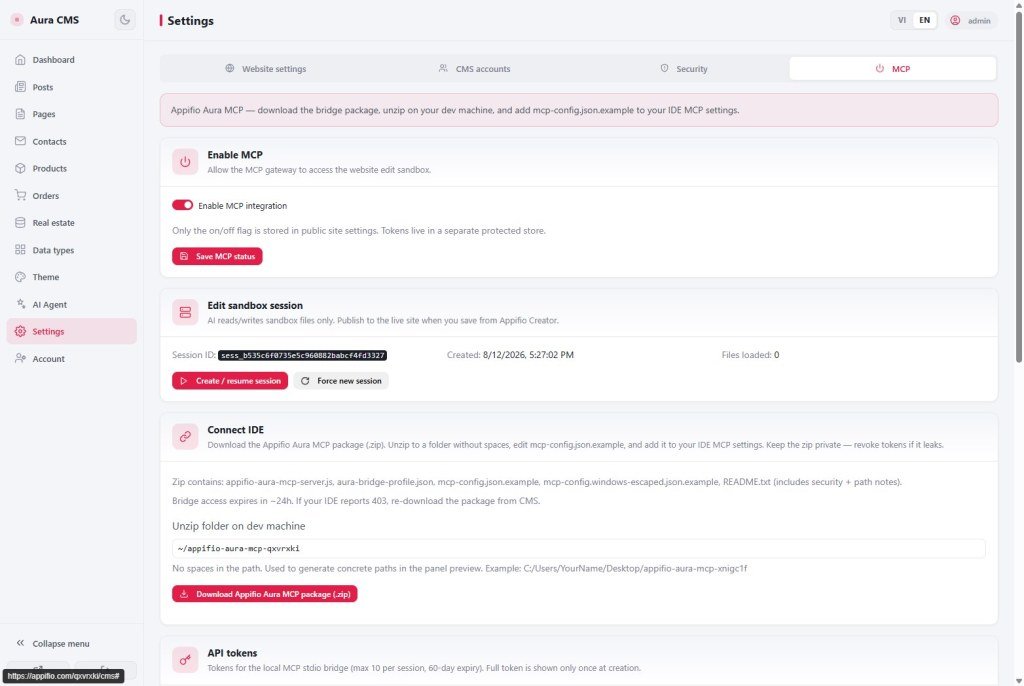
- Open "MCP" in Creator (or Settings → MCP in Aura CMS - same feature, two entries). Enable "Enable MCP integration".
- Click "Create / resume session" - you should see "MCP session ready." with Session ID, created time, loaded file count. For a clean start, use "Create new session".
- Set Token label (e.g. "Dev machine") → "Create token". Copy immediately - warning: "Token created - copy now; it won’t be shown again."
- Fill "Extracted folder on your machine" (no spaces, e.g.
C:/Users/YourName/Desktop/appifio-aura-mcp-myshop) → "Download Appifio Aura MCP package (.zip)". - Unzip into that exact folder. Open
mcp-config.json.example, paste into IDE MCP settings - prefer Method A (forward slash /), or Method B (escaped backslash) for older Windows paths. - The config
commandmay benodeornpx- you need Node.js 18+ installed; restart the IDE if you just installed Node. - Click "Save MCP state" to lock the full config.
- In the IDE, try a simple prompt (e.g. “list files in the sandbox”) before large refactors.
- Creator MCP and CMS MCP (G05) share one gateway - configure once, then Save MCP state.
- When the token expires (60 days) or the zip expires (~24h): Revoke old token → new session if needed → Create token → download a fresh .zip.
4. Compared with other tools
- Typical Cursor/Claude Desktop MCP servers: same Model Context Protocol; Aura MCP is special because IDE AI only reaches the app’s own sandbox - not your whole machine.
- GitHub Codespaces / VS Code Remote: similar “outside IDE → remote workspace”; here the workspace is the app content sandbox, not a full server.
- Webflow/Framer: no equivalent - a big Appifio difference when you need stronger tools than Creator alone.
5. Critical technical limits
Sandbox ≠ live: IDE/MCP edits stay in the session sandbox. Visitors only see them after you open Appifio Creator and click "Save changes" - MCP does not auto-publish.
Max 10 tokens per session; tokens expire in 60 days. The bridge .zip expires after ~24 hours - if the IDE returns 403, download a fresh MCP package from Creator/CMS.
Extract folder paths must not contain spaces; a single unescaped \ in Windows JSON breaks config - use Method A or Method B exactly as documented.
6. Security
- Keep the zip and token private - if leaked, click "Revoke" in the API Token table immediately.
- Each token is shown in full once at creation - no way to view again; only revoke and create a new one.
- Label tokens by machine/user (e.g. "Nam’s laptop", "Office PC") so you can revoke the right one without cutting others off.
7. Common issues
| Situation | Fix |
|---|---|
| “Create a sandbox edit session before creating a token” | Run Create / resume session first, then Create token |
| IDE 403 after one day | Bridge package expired ~24h - download a new MCP .zip |
| Broken JSON when pasting a Windows path | Don’t use a single raw \; use Method A (/) or Method B (\\\\) |
| AI edited in IDE; visitors see nothing | By design - open Creator, check Changes, then Save changes to publish |
8. Tips
- Enable MCP only when you truly need a stronger IDE (large refactor, hard debug) - small edits are often faster in Creator + AI Agent.
- Note when you created the token/zip so you renew before 24h / 60-day expiry.
- After an IDE session, always return to Creator, review Changes, and Save changes - don’t leave sandbox work unpublished for long.
9. Self-check
- Did you follow: Enable MCP → Create session → Create token → Download package → Configure IDE?
- Do you know sandbox ≠ live, and MCP doesn’t auto-publish?
- Do you remember the token shows once and the zip expires ~24h?
Next lesson
H03 - Android Mock & Capacitor APK path
Preview the app in an Android phone frame, and understand APK BETA limits.
Internal navigation (same language)
Appifio Creator · User guide · H02
